To save for competitions from Photoshop, do the following:
1. Once you are done with any edits to the image, select ‘Save for Web’ from the File menu.

2. This will bring up the dialog box as seen below
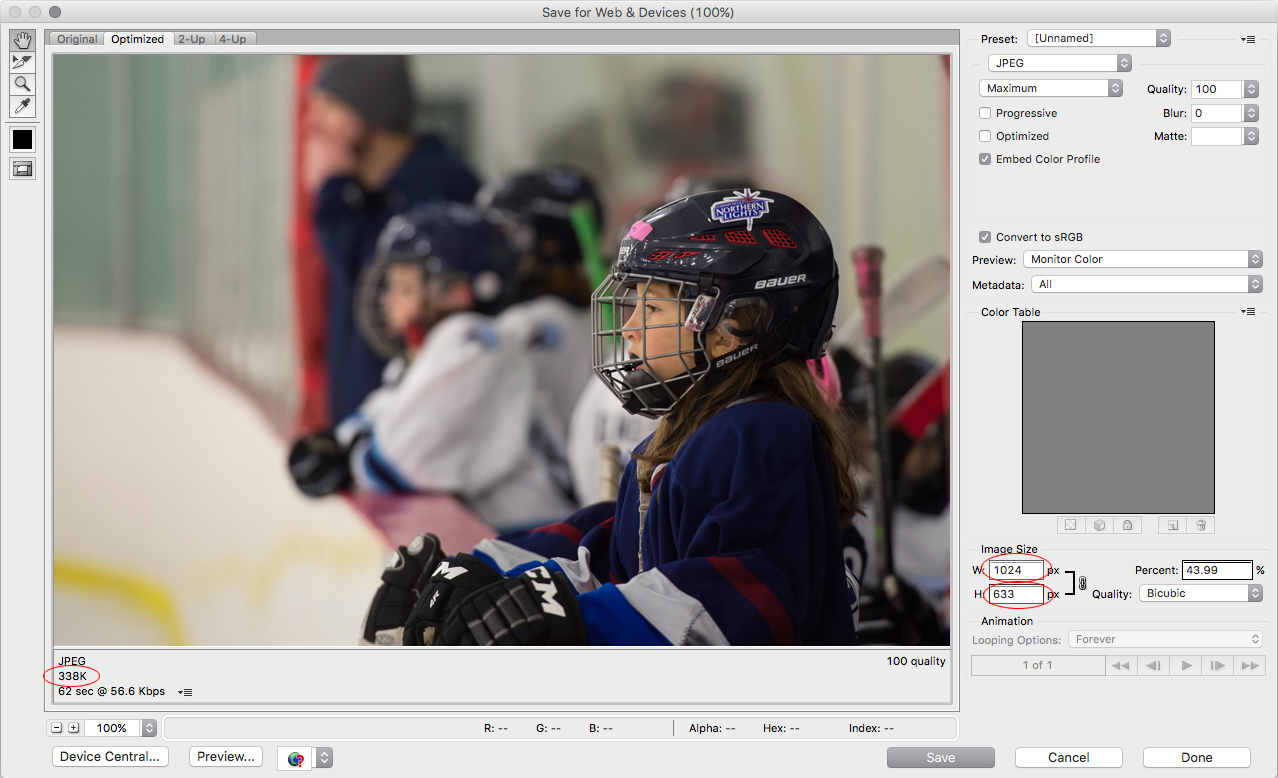
3. set the image size as follows:
For a vertical image
Set height (H) to 1050, make sure that the calculated width less or equals 1400 (in the W field)
For a horizontal or square image
Set width (W) to 1400, make sure that the calculated height is less or equals to 1050
Set Quality to Bicubic.
4. Above, Deselect ‘Progressive’ and ‘Optimized’ check boxes and select the ‘Embed Color Profile’ checkbox.
5. Select ‘Convert to sRGB’ checkbox.
6. Select Metadata ‘All’
7. At the top of the window select JPEG and set quality to Maximum. Make sure the output file size is below 1.2Mb, shown below the image on the left. If not, then lower the quality below 100.
Explanation of the Export Sections
Preset: When you are done setting all the settings, Preset should say [Unnamed]. You can use the small drop down box to the right of this box and select Save Settings … and it will ask you for a name. This will save the settings as a preset that you can select on the drop down Preview box the next time. However, unlike Lightroom, this one is of limited value, it only saves the top settings down to Embed Color Profile. You still need to review and set all the lower choices each time. Some of these are sticky, so be sure to check all settings. For example if you turn off Convert to sRGB on one image, that setting will stick and using the preset will not set it back on the next time you save for web.
Jpeg Quality: Set this to maximum, it will set the percent to 100. PS is more aggressive than Lightroom in compressing files and will generally create a reasonable file size at maximum. If the file size under the preview image indicates 1.2Mb or greater, lower this to Very High or High to get the file size down to a few hundred KB. You can also type in numbers or use the slider to set the quality.
Progressive: This will produce a progressive jpeg for web use. It will display a low resolution image quickly and then improve the image as it continues loading. One NECCC rep indicated that this causes a problem on some projectors, make sure it is off.
Optimized: This will fine tune the jpeg, it makes a small reduction in size, we don’t need it.
Embed Color Profile: This will embed the sRGB profile into the image. This is recommended, some newer browsers are color managed and will use this information. If we post your image to the web site, it will look the best.
Blur: leave blank or zero, this will reduce file size at cost of image quality. Matte: Leave blank, not sure exactly what this does.
Convert to sRGB: Make sure this is checked. If you work in Adobe RGB or Pro Photo RGB inside Photoshop, your image will look desaturated and flat when displayed in sRGB. Clicking and unclicking this box will update the preview and you can see the difference. If your PS workspace is sRGB, this shouldn’t have an impact, but won’t hurt.
Preview: Set to Monitor Color, this will use your profile if your monitor is calibrated.
Metadata: Set to All. You can choose a lower option if you want to limit the information in your EXIF section of the image. Don’t go below copyright and contact info, as these should always be in your image. In most cases they can be set in your camera and be in every image.
Quality: Set to Bicubic. Changing an image size requires resampling and interpolation. You always want to use Bicubic. However, Photoshop has two alternate choices, Bicubic Smoother and Bicubic Sharper. Which is best depends on the image, you may want to try all three to see which one works best on your image. Note that Lightroom has automated this and it picks the best one.
Animation: This should be grayed out for a jpeg.